I started a small hobby project to develop a simple web-controllable digital I/O card for controlling and monitoring various kinds of peripheral devices. As a hardware platform I selected Arduino Uno micro-controller board with W5100 Ethernet Shield for network access. Arduino was selected as hardware platform due its simplicity and low price point (Arduino Uno compatible board + Ethernet shield cost under $15 with home delivery). To follow-up agile and TDD development practices I decided to setup a continuous integration environment for automated building and testing of the control software in the embedded hardware.
In general setting up of the continuous integration for embedded system projects is quite similar as for any other project, but you need to take into consideration some additional issues such:
- Uploading and flashing the software binary into the embedded hardware.
- Wiring and triggering (or simulating) of physical interfaces of embedded hardware.
- Gathering of logs and debug traces from the embedded system.
This example shows how to setup Arduino-based project to build and run on Jenkins continuous integration server. In this example the Jenkins CI is running in Ubuntu server and tests are implemented in Java (JUnit + Selenium) with Maven project configuration.
System Overview
The example Arduino project is simple web-controllable digital I/O board with 4 inputs and 4 outputs. The state of I/O ports can be monitored and controlled via simple web-UI shown below.
 Arduino Web-UI for controlling I/O ports.
For the build and test environment the Arduino is connected to build server via USB and LAN connections. The USB connection is used to upload new software binaries for testing. The LAN connection is used to to test the web-UI of the software. In the setup the Arduino input pins 1-4 are connected to the corresponding output pins 1-4, enabling testing of both (1) reading input values and (2) writing output values. The system produces system log for test purposes via serial communication over USB. The test setup is illustrated in Figure below.
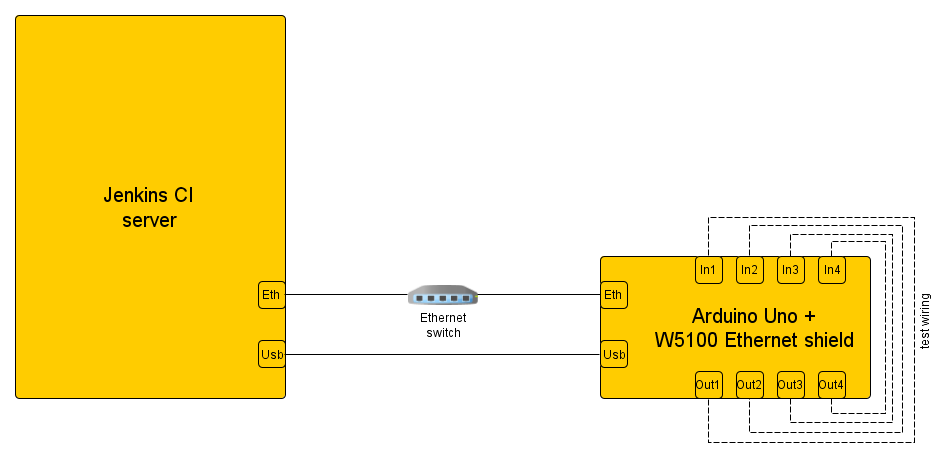 Build and test environment configuration.
Prerequisites
First we need to setup the test and development environments. The tools used in this example are:
- Arduino IDE, development environment for Arduino development.
- Ino, command line tools for Arduino to integrate it with Jenkins CI *
- Picocom, terminal emulation for serial communication (used by Ino).
- Jenkins CI, continuous integration environment.
*) Since Arduino version 1.5.0 there is also native command-line support in Arduino, which can be also used for Jenkins CI integration. More information about Arduino CLI options can be found here.
Install Arduino IDE and tools
sudo apt-get install arduino arduino-coreSee details for additional configuration in Arduino Playground.
Install Ino command line toolkit for Arduino
sudo pip install inoSee details for additional configuration in Ino website.
Install Picocom terminal emulation for serial communication
sudo apt-get install picocomInstall Jenkins CI
wget -q -O - https://jenkins-ci.org/debian/jenkins-ci.org.key | sudo apt-key add -
sudo sh -c 'echo deb http://pkg.jenkins-ci.org/debian binary/ > /etc/apt/sources.list.d/jenkins.list'
sudo apt-get update
sudo apt-get install jenkins
See details for additional configuration in Jenkins CI wiki.
Create Arduino Ino code project
After installation of the toolkit, we create the Arduino project using Ino tools
mkdir webio
cd webio
ino init
The ino init command creates project structure with src and lib folders and a src/sketch.ino file as a base sketch to implement the application code.
+---lib
+---src
    |   sketch.ino
Create maven test project
Next we create a simple Maven project for tests. First we add maven pom.xml to configure the JUnit tests using maven-surefire-plugin.
<project xmlns="http://maven.apache.org/POM/4.0.0" xmlns:xsi="http://www.w3.org/2001/XMLSchema-instance"
         xsi:schemaLocation="http://maven.apache.org/POM/4.0.0 http://maven.apache.org/xsd/maven-4.0.0.xsd">
    <modelVersion>4.0.0</modelVersion>
    <groupId>fi.jperala.webio</groupId>
    <artifactId>webio-tests</artifactId>
    <version>1.0-SNAPSHOT</version>
    <packaging>jar</packaging>
    <dependencyManagement>
        <dependencies>
            <dependency>
                <groupId>junit</groupId>
                <artifactId>junit</artifactId>
                <version>4.11</version>
            </dependency>
            <dependency>
                <groupId>org.seleniumhq.selenium</groupId>
                <artifactId>selenium-java</artifactId>
                <version>2.44.0</version>
            </dependency>
            <dependency>
                <groupId>com.google.code.gson</groupId>
                <artifactId>gson</artifactId>
                <version>2.2.4</version>
            </dependency>
            <dependency>
                <groupId>com.github.detro</groupId>
                <artifactId>phantomjsdriver</artifactId>
                <version>1.2.0</version>
            </dependency>
        </dependencies>
    </dependencyManagement>
    <dependencies>
        <dependency>
            <groupId>junit</groupId>
            <artifactId>junit</artifactId>
        </dependency>
        <dependency>
            <groupId>org.seleniumhq.selenium</groupId>
            <artifactId>selenium-java</artifactId>
        </dependency>
        <dependency>
            <groupId>com.github.detro</groupId>
            <artifactId>phantomjsdriver</artifactId>
        </dependency>
    </dependencies>
    <build>
        <pluginManagement>
            <plugins>
                <plugin>
                    <groupId>org.apache.maven.plugins</groupId>
                    <artifactId>maven-surefire-plugin</artifactId>
                    <version>2.18.1</version>
                </plugin>
                <plugin>
                    <groupId>org.apache.maven.plugins</groupId>
                    <artifactId>maven-compiler-plugin</artifactId>
                    <version>3.2</version>
                    <configuration>
                        <source>1.6</source>
                        <target>1.6</target>
                    </configuration>
                </plugin>
            </plugins>
        </pluginManagement>
        <plugins>
            <plugin>
                <groupId>org.apache.maven.plugins</groupId>
                <artifactId>maven-surefire-plugin</artifactId>
            </plugin>
            <plugin>
                <groupId>org.apache.maven.plugins</groupId>
                <artifactId>maven-compiler-plugin</artifactId>
            </plugin>
        </plugins>
    </build>
</project>
In the pom.xml we define dependencies for selenium-java for web application testing with Selenium. In addition, we define dependency for phantomjsdriver to use the PhantomJS and GhostDriver to execute our Selenium tests in headless PhantomJS browser.
Next we add the JUnit test (WebIOTest.java in folder src/main/test/fi/jperala/webio) to test changing the output pin state and verifying that the both input and output pin states were changed correctly. The test is parameterized and it takes as input the pin index under test.
package fi.jperala.webio;

import java.util.concurrent.TimeUnit;
import org.junit.*;
import org.openqa.selenium.*;
import java.util.Arrays;
import java.util.Collection;
import java.util.regex.Matcher;
import java.util.regex.Pattern;
import org.junit.Assert;
import org.junit.Before;
import org.junit.Test;
import org.junit.runner.RunWith;
import org.junit.runners.Parameterized;
import org.openqa.selenium.phantomjs.PhantomJSDriver;
import org.openqa.selenium.phantomjs.PhantomJSDriverService;
import org.openqa.selenium.remote.DesiredCapabilities;

@RunWith(Parameterized.class)
public class WebIOTest {

    /**
     * Tests are parameterized by I/O number.
     *
     * @return Test parameters
     */
    @Parameterized.Parameters
    public static Collection inputPins() {
        return Arrays.asList(new Object[][]{
            {0}, {1}, {2}, {3}
        });
    }

    private static final String PHANTOMJS_BINARY = "/usr/bin/phantomjs";
    private static final String BASE_URL = "http://192.168.0.111/";
    private final int pinNo;
    private WebDriver driver;

    public WebIOTest(int pinNo) {
        this.pinNo = pinNo;
    }

    @Before
    public void setUp() throws Exception {
        DesiredCapabilities caps = new DesiredCapabilities();
        caps.setCapability(PhantomJSDriverService.PHANTOMJS_EXECUTABLE_PATH_PROPERTY, PHANTOMJS_BINARY);
        driver = new PhantomJSDriver(caps);
        driver.manage().timeouts().implicitlyWait(30, TimeUnit.SECONDS);
    }

    @After
    public void tearDown() throws Exception {
        driver.quit();
    }

    /**
     * Test that input and output are always in same state and changing the out
     * state changes both the input and output states correctly.
     *
     * Board test configuration: * Inputs are connected to outputs
     *
     * @throws Exception Test error
     */
    @Test
    public void testInputStateChange() throws Exception {
        driver.get(BASE_URL);
        boolean beforeOutputState = getPinState(pinNo, false);
        boolean beforeInputState = getPinState(pinNo, true);
        Assert.assertEquals("Input and output not in same state.", beforeOutputState, beforeInputState);
        changeInputState(pinNo);
        Assert.assertNotEquals("Output state was not changed.", beforeOutputState, getPinState(pinNo, false));
        Assert.assertNotEquals("Input state was not changed.", beforeOutputState, getPinState(pinNo, true));
    }

    /**
     * Change the input state by clicking the button in web application.
     *
     * @param index Input index
     */
    private void changeInputState(int index) {
        driver.findElement(By.xpath("(//button[@name='pin'])[" + (index + 1) + "]")).click();
    }

    /**
     * Get the pin state by finding the value in the web application.
     *
     * @param index Input index
     * @param input True to get Input pin, false to get Output pin.
     * @return True if pin is HIGH, false if LOW.
     */
    private boolean getPinState(int index, boolean input) {
        final String pattern;
        if (input) {
            pattern = ".*Input #" + index + ": (\d).*";
        } else {
            pattern = ".*Output #" + index + ": (\d).*";
        }
        final String bodyText = driver.findElement(By.cssSelector("body")).getText();

        Pattern r = Pattern.compile(pattern);
        Matcher m = r.matcher(bodyText);
        if (m.find()) {
            String value = m.group(1);
            if (value.equalsIgnoreCase("0")) {
                return false;
            } else if (value.equalsIgnoreCase("1")) {
                return true;
            } else {
                throw new RuntimeException("Failed to parse input state, state = " + value);
            }
        } else {
            throw new RuntimeException("Failed to parse input state, no pattern match.");
        }
    }
}
In the end, we have a project folder with ino and maven project that is now ready to be committed in to version control system of your choice and to be configured for Jenkins continuous integration. The resulted project folder structure is following:
|   pom.xml
+---lib
+---src
|   |   sketch.ino
|   \---test
|       \---java
|           \---fi
|               \---jperala
|                   \---webio
|                       |   WebIOTest.java
In this example the BitBucket was used as Git version control repository. You may want to add a .gitignore (or svn:ignore in case of Subversion) file to avoid any build artifacts (e.g., target and lib/.holder folders) to be committed in the repository.
Setup Jenkins project
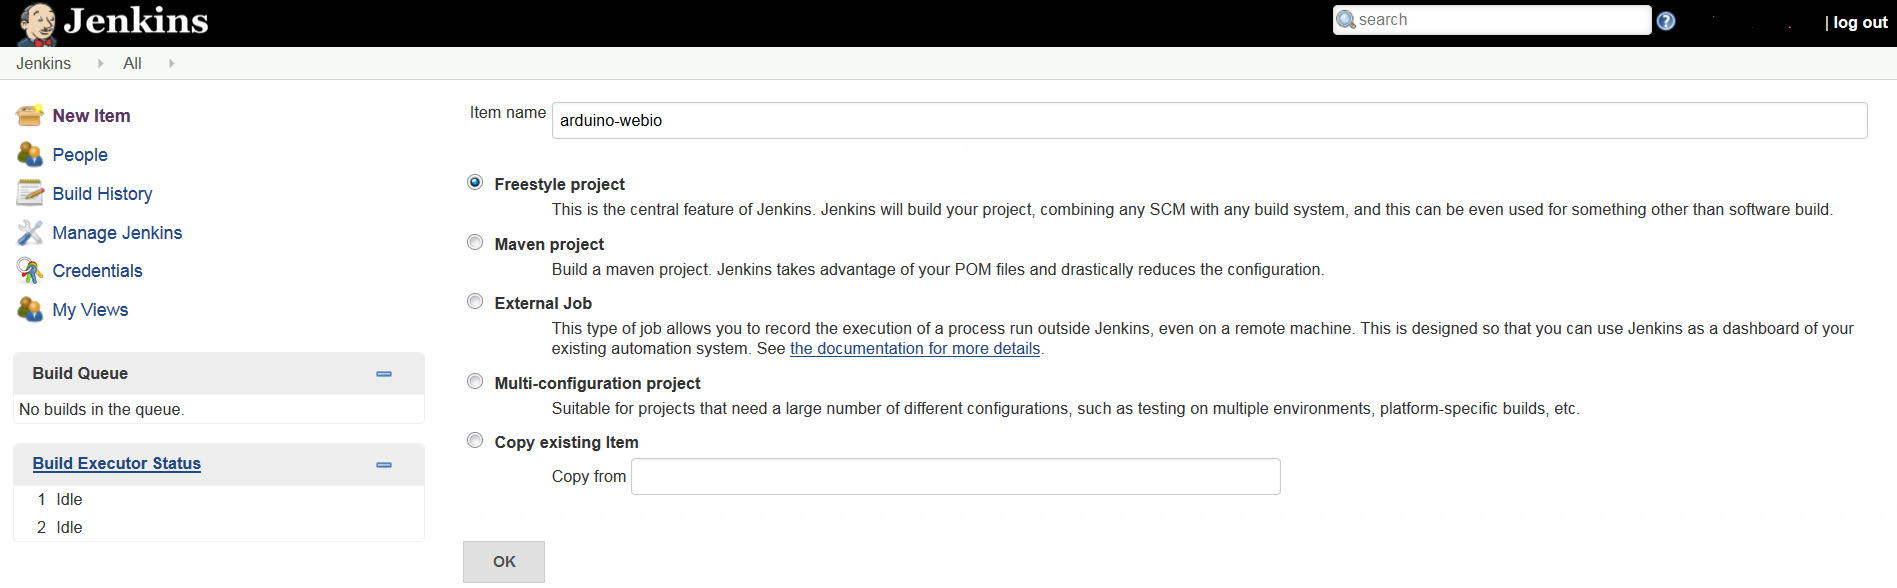
Create new project
First, we create a new free-style Jenkins project:
Configure project
Next, we configure the created project:

- Project name and description. Name and description of the project.
- Handling of old builds. We keep max. 10 builds from last 7 days.
- Source Code Management. We configure Jenkins to get the code from BitBucket.
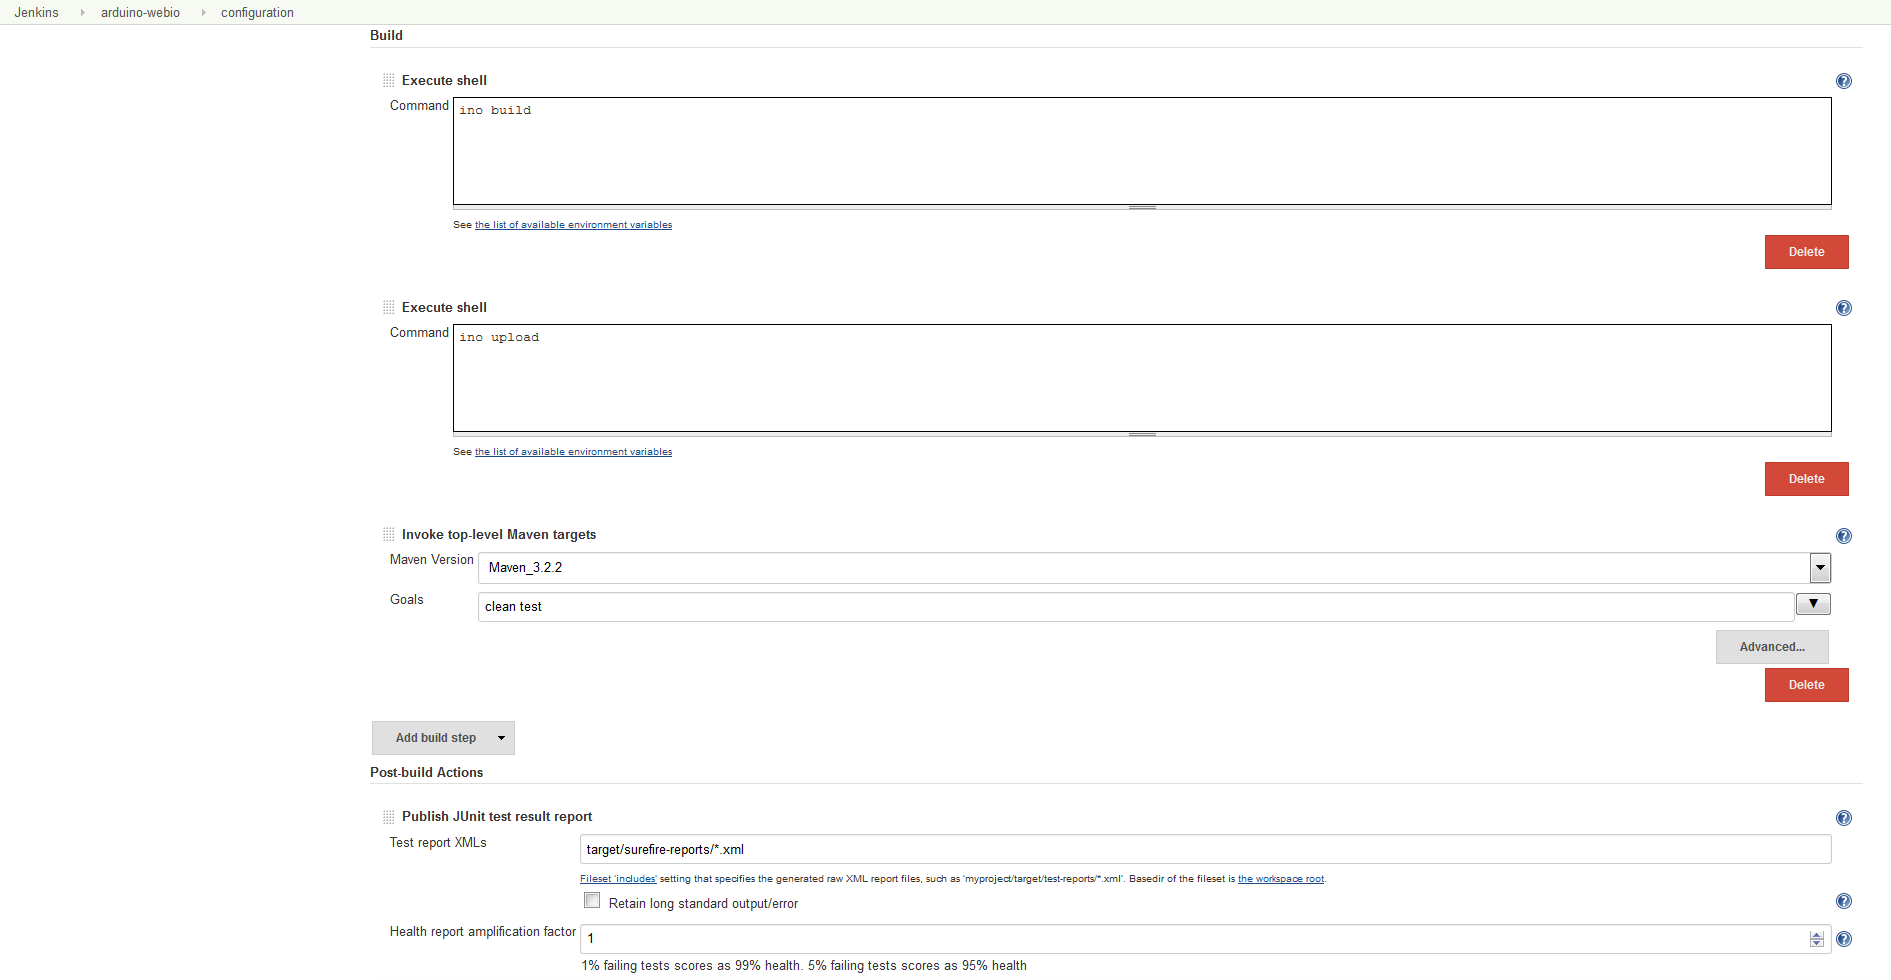
- Build. We configure the Jenkins to carry out the build and test steps:
- Ino Build. Build the Arduino project.
- Ino Upload. Upload the build binary to Arduino hardware.
- Maven clean test. Execute maven tests against the embedded system.
- Post-build. We configure the Jenkins to publish the JUnit test results.
Execute project
Finally, we are ready execute the Jenkins project. Once launched, the Jenkins fetches the project from version control, builds and uploads the binary to embedded system, and executes the JUnit/Selenium tests. The build process can be monitored from the Jenkins Console Outptut.
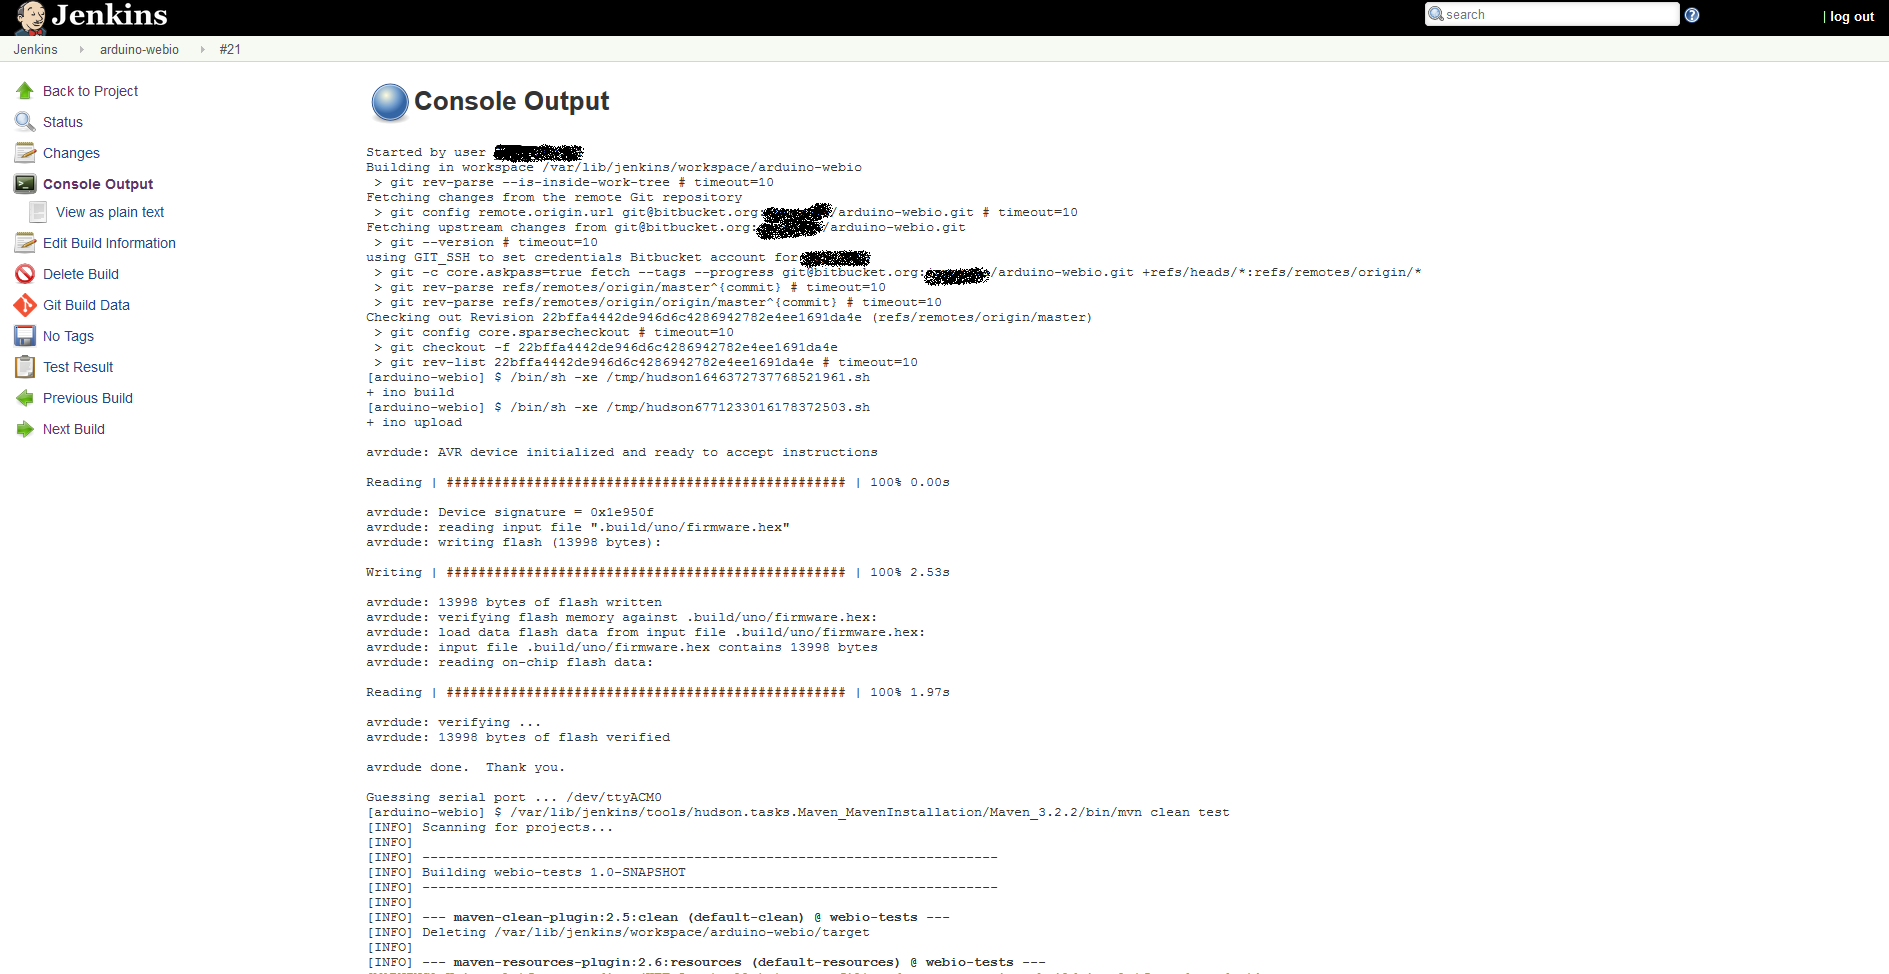 Jenkins log on successfull job execution.
Enjoy!